

Good day everyone! As you might be thinking, this post is a little different from my recent plethora of makeup looks but alas it is still me here, I just had one of my wild and crazy ideas as usual! So my little crafting buddies I bring to you my basic steps on how to make this super easy, yet super artsy, autumnal wall piece. Get ready for all things autumnal!
What you will need:
- 9 fallen leaves (supple not crunchy)
- A large heavy book
- Some A4 paper
- Plenty of other books to stack on top of the heavy book
- White card (a sheet that is larger than your frame!) (The Range £1.50)
- Craft/ PVA glue (Poundland £1.00)
- An old paint brush
- A box photo frame (The Range £5.29)
Instructions:
- To begin creating this beautiful little piece of autumn art it requires you to take an autumnal walk and collect as many fallen leaves as possible. Only pick supple ones (avoid the crunchy ones as they won't press well and may fall apart). Try to pick them in an array of colours and shapes to, to capture every essence of Autumn in your piece. Collect at least 12 so if some don't press too well you still have others to use.
- Returning home, or wherever your humble abode at that time may be, prepare your leaf press in a heavy book by placing two sheets of A4 paper in between two to three of the very last pages of the book (pressing the leaves closer to the bottom on the book leaves more weight on top of them to press them more effectively).
- With either four or six leaves to a page, depending on their size, spread the leaves evenly between the pages and sandwiched between the A4 paper (this hopefully prevents the book from getting damaged during the pressing process).
- Now carefully place your book/ makeshift leaf press tucked away and add a couple more books or weighty objects on top of the book to add weight to the press. Be careful, don't carry things that are too heavy and don't overload the surface you are placing the books and objects on with weight.
- Now patiently, and I stress patiently because you don't want to disturb the leaves and upset their process, leave the leaves to be pressed in the book for at least a week.
- Check on the leaves no sooner than a week and they should be pressed and ready. If not leave them to press for a few more days and keep checking them each day.
- Now for the exciting part!
- To avoid any surface disasters its best to cover your work area with some old newspaper or towel to prevent any glue ruining incidents.
- Firstly cut your card to the size of the first inner border of the frame. In other words, you want the card to be small enough to fit the canvas to size perfectly and not so small that it falls into the frame as remember that this is a box frame.
- Place the card on your work area and carefully arrange the leaves into the pattern your wish to display them in, in your frame.
- Once you have chosen your layout, carefully lay your nine chosen leaves with their backs (the sides which you are going to stick to the card) out on your work surface next to the card. You don't want to do any gluing action on the card in order to avoid spoiling it so remember or place the leaves in the order which you want to display them.
- Taking sparing amounts of glue onto a paint brush, one-by-one gently brush the back of a leaf with a light layer of glue and place it in your chosen position on the white card. Gently and cautiously smooth the leaf over with your finger to adhere it to the card. You may have to gently press them down for a minute or so with your fingers to ensure they stick.
- It's best to work in a well ventilated room for this as it can start to smell quite glue-y.
- Carefully repeat this step with all the leaves until they are all glued in place.
- Now leave the card with glued leaves on to dry for at least half an hour.
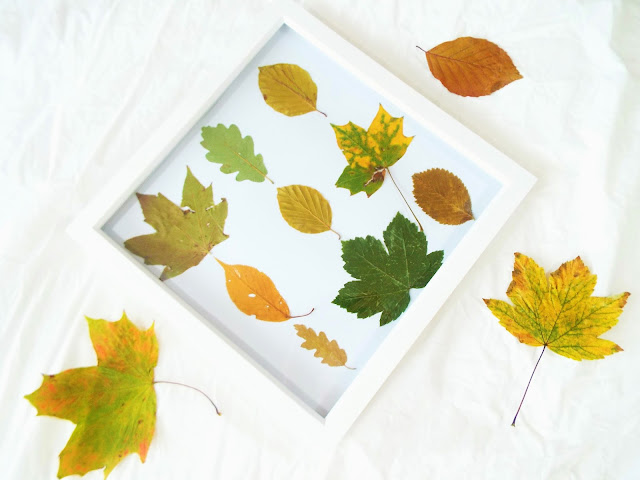
- Returning to your little gem you have created, the leaf art should now be complete! Simply place the card into the frame, place the canvas of the frame on and secure it in.
Now hopefully you should end up with something that looks a little like my autumnal wall piece that I have pictured above! If you do have a go at this very simple yet very fun and all things autumnal craft piece feel free to adapt it, maybe using all the same shapes of leaves or placing them in a different pattern. And if you do so don't forget to Tweet (@EBandSparkles) or Instagram (@elliebowsandsparkles) me a picture as I would love to see your beautiful creations as always! I very much enjoyed putting together this piece and it is both perfect to complete on your own or with others! There is also the aspect of adding a hot chocolate to the leaf collecting walk too and making a full day out of it out in the beautiful outdoors! Thank you ever so much for reading the post and I will see you very soon! :)
Ellie x
Comments
Post a Comment